Startup apps, many people like them, and many even try to disable them if they’re pre-added on their devices. For everyone who’s wondering what these are, Startup apps are those apps that load automatically as soon as a device over which they’re registered, turns on. They might be useful in many cases and for many people. For example, some people prefer using antivirus software on their devices, which is a good thing, and it’d be better for that software to start as soon as the device boots up. This is just a single example and there can be many instances where startup apps can be really useful for you.
Though they’ve their own benefits, startup apps may have some drawbacks too. When you start adding apps to startup, your operating system gets more loaded while booting up. So, if you add more apps to the startup, it’d take more time for your operating system to prepare your desktop and working space. It might also affect the overall performance of your device because the startup apps would keep running in the background too and would slow down your Windows device.
But that doesn’t mean this feature isn’t useful. It still has many uses and capabilities and that’s why many users want to know how to add startup apps in Windows 11.
Steps to add Apps to Startup in Windows 11
So, here’s a complete, step-by-step guide for you to add startup apps on your Windows 11 device. Let’s get started:
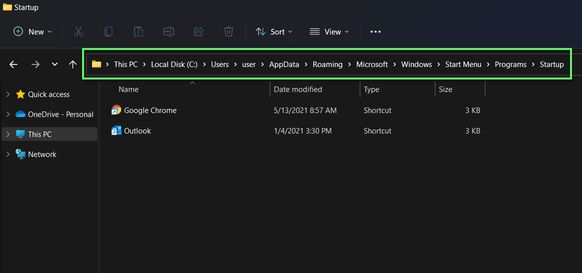
- The fastest way of adding an app to startup is to put its shortcut directly to the startup folder. You can find the startup folder here:
C:\Users\user\AppData\Roaming\Microsoft\Windows\Start Menu\Programs\Startup
Note: replace user with your user name.
Or, Press ‘Win + R’ on your keyboard and a pop-up window will appear. That pop-up window would open any internet resource, program or folder for you as soon as you type your need in the box given in the pop-up window. Type ‘shell:startup’ in the box.
- You’d be taken to the startup folder. Now simply paste the shortcut to any app of your choice which you want as an startup app.
You can also drag and drop a ‘.exe‘ file to this folder while holding the ‘Alt’ key.
How to add Startup apps to All users in Windows 11
Similarly, you can add startup apps for all users with the help of the steps given below:
- Just as mentioned earlier, press ‘Win + R’ on your keyboard and you’d get the same pop-up window that we got previously.
- Now type ‘shell:Common Startup’ in the box provided and continue by clicking ‘ok’ or pressing the ‘enter’ key.

- Further, you’ll be directed to this folder-
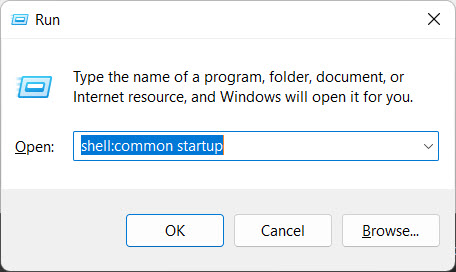
C:\ProgramData\Microsoft\Windows\Start Menu\Programs\Startup
Now add the shortcuts for any or all apps you’d want to start automatically as soon as your Windows 11 device boots up, in this folder.
Adding apps to startup using Windows 11 Registry
There’s also an alternative method for adding your favorite apps to the startup for your Windows 11 device. Though this method is a bit complicated when compared to the previous one, choices may differ and you could find it better than the other method. So, here’s the alternate method for adding startup apps in Windows 11 registry:
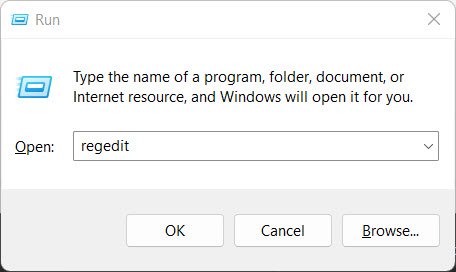
- Press ‘Win + R‘ on your keyboard. You’d get the same pop-up window as earlier.
- Type ‘regedit‘ in the box given next to ‘open’. Now press the ‘enter’ key.
- You’d reach the Registry Editor App, which has many other useful functions too.
Now search and go to this address-
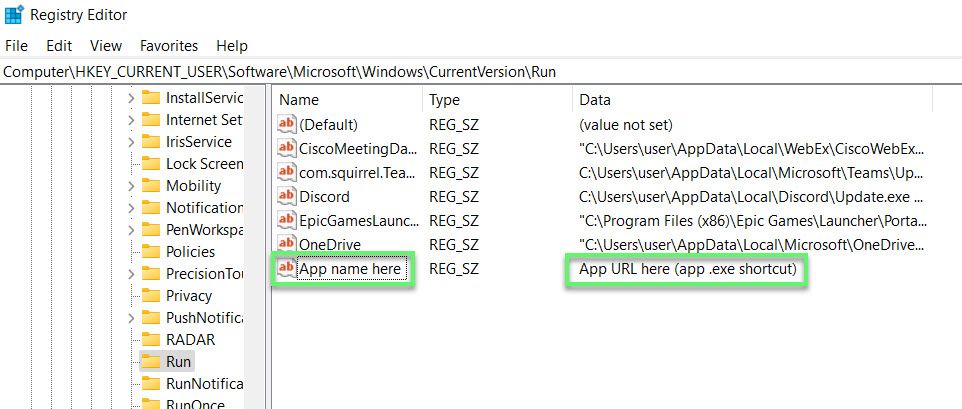
HKEY_CURRENT_USER\Software\Microsoft\Windows\CurrentVersion\Run.
If your Windows device has any pre-registered startup apps for the current user, you’d be able to see them here. - Now right click in the left section. Select ‘New’ and then ‘String Value’.
- Next, you’ll have to change the name to the name of the app which you want to run as a startup. It can be the name of any app on your Windows device, such as ‘Chrome’ or ‘Photos’.

- It’ll also ask you for the full path of the app which you want to set for startup. So, set it’s value data to the full path of the desired app.
These steps can be repeated for every other app which you want to register for a startup.
Though if you ask me, I’d say that the 1st method is the easiest one. The Registry Editor App method also has its benefit; anyone who didn’t know about it till now might get the hint of how useful it is. We can give a detailed overview of the Registry Editor App if you want us to, so leave a comment if you wanna know more about it and its uses.
How to add the store Apps to Startup in Windows 11
Okay, so what about the store apps? Can they be added to startup too? Yeah, why not? Just follow the simple steps given below:
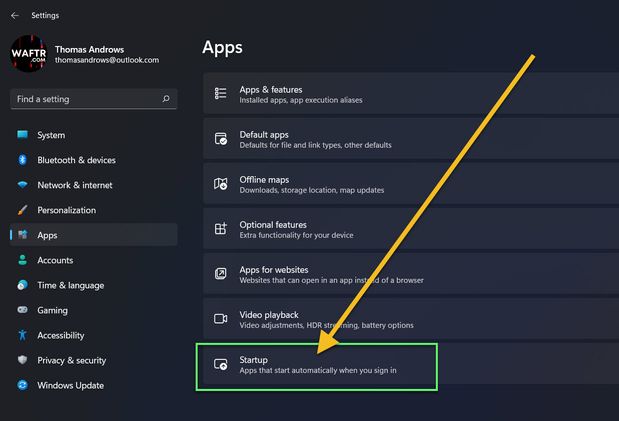
- Open the ‘Settings’ app on your Windows device. We’re confident that all of you would know how to do so. If not, then use the shortcut ‘Win + I’.

- Among all the options displayed on the left, find and select ‘Apps’.
- Now click on ‘Startup’ on the right side of the screen.
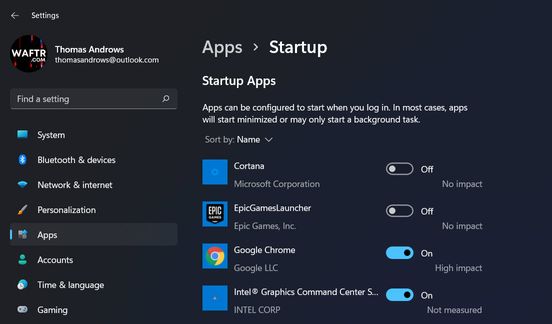
- You’d get to a page where you can see all the store apps and select which of them should startup automatically and which shouldn’t. You can do this by clicking on the toggle bar next to every app.

- Now close the ‘settings’ app and you’re all done.
So, here concludes everything you’d need to know for adding an app to startup for your Windows 11 device. These same steps can be followed with some changes to remove an existing app from the startup folder.
Feel free to ask any questions and share your views on the same.


![Read more about the article Top 10 Hotspot Apps For Windows 11 [2022]](../https@610698-1978843-raikfcquaxqncofqfm.stackpathdns.com/wp-content/uploads/2022/09/Hotspot-apps-on-Windows-11-300x169.jpg)